使用sed命令 做字符串替换
set “s/txl/TXL” a.txt 报错 sed:-e 表达式 #1,字符 25:未终止的“s”命令
查询发现没有终止符 即 “”中要以 / 结尾
sed “s/txl/TXL/” a.txt 完成!

雄关漫道真如铁 而今迈步从头越
使用sed命令 做字符串替换
set “s/txl/TXL” a.txt 报错 sed:-e 表达式 #1,字符 25:未终止的“s”命令
查询发现没有终止符 即 “”中要以 / 结尾
sed “s/txl/TXL/” a.txt 完成!
Linux服务器运行一段时间后,由于其内存管理机制,会将暂时不用的内存转为buff/cache,这样在程序使用到这一部分数据时,能够很快的取出,从而提高系统的运行效率,所以这也正是linux内存管理中非常出色的一点,所以乍一看内存剩余的非常少,但是在程序真正需要内存空间时,linux会将缓存让出给程序使用,这样达到对内存的最充分利用,所以真正剩余的内存是free+buff/cache
但是有些时候大量的缓存占据空间,这时候应用程序回去使用swap交换空间,从而使系统变慢,这时候需要手动去释放内存,释放内存的时候,首先执行命令 sync 将所有正在内存中的缓冲区写到磁盘中,其中包括已经修改的文件inode、已延迟的块I/O以及读写映射文件,从而确保文件系统的完整性
说到清理内存,那么不得不提到/proc这一个虚拟文件系统,这里面的数据和文件都是内存中的实时数据,很多参数的获取都可以从下面相应的文件中得到,比如查看某一进程占用的内存大小和各项参数,cpu和主板的详细信息,显卡的参数等等;相应的关于内存的管理方式是在/proc/sys/vm/drop_chches文件中,一定要注意这个文件中存放的并不是具体的内存内容,而是0-3这几个数字,通过文件大小只有1B也可以知道,而这些代号分别告诉系统代表不同的含义如下:
0:0是系统默认值,默认情况下表示不释放内存,由操作系统自动管理
1:释放页缓存
2:释放dentries和inodes
3:释放所有缓存
所以根据上面的说明,分别将1,2,3这3个数字重定向到drop_caches中可以实现内存的释放,一般释放内存都是重定向3到文件中,释放所有的缓存
比如这里只释放页缓存,首先使用free -h查看当前内存剩余
首先写缓存到文件系统:
sync
然后执行下面命令释放内存(页缓存buff/cache):
echo 1 > /proc/sys/vm/drop_caches
执行完之后,再次查看内存剩余:
会发现内存被释放了,可用内存确实变为1.8G左右
到这里内存就释放完了,现在drop_caches中的值为1,如果现在想让操作系统重新分配内存,那么设置drop_caches的值为0即可:
echo 0 > /proc/sys/vm/drop_caches
注:在2.6.x系列的内核中可以设置为0,3系列的内核中设置为0就会报错,write error: Invalid argument。只能重启服务器恢复。
另外需要注意的是,在生产环境中的服务器我们不要频繁的去释放内存,只在必要时候清理内存即可,更重要的是我们应该从应用程序层面去优化内存的利用和释放,经常清理内存可能只是暂时屏蔽的应用程序中的一些bug,所以更重要的是程序的调优,其他的交给操作系统来管理。
问题:
Traceback (most recent call last):
  File "/usr/libexec/urlgrabber-ext-down", line 75, in <module>
    main()
  File "/usr/libexec/urlgrabber-ext-down", line 61, in main
    fo = PyCurlFileObject(opts.url, opts.filename, opts)
  File "/usr/lib/python2.7/site-packages/urlgrabber/grabber.py", line 1258, in __init__
    self._do_open()
  File "/usr/lib/python2.7/site-packages/urlgrabber/grabber.py", line 1589, in _do_open
    self._do_grab()
  File "/usr/lib/python2.7/site-packages/urlgrabber/grabber.py", line 1723, in _do_grab
    self._do_perform()
  File "/usr/lib/python2.7/site-packages/urlgrabber/grabber.py", line 1517, in _do_perform
    raise KeyboardInterrupt
KeyboardInterrupt
解决方案:
打开这个文件:/usr/lib/python2.7/site-packages/urlgrabber/grabber.py
找到 elif errcode in (42, 55, 56):
用 elif errcode == 42:替换
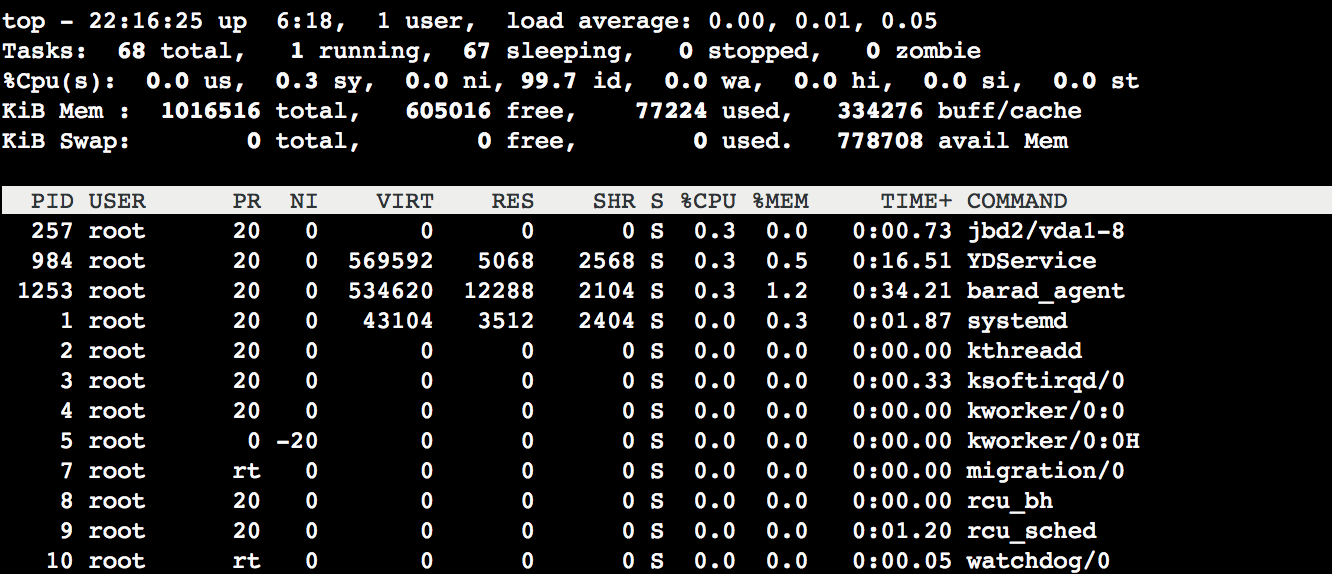
Top:Linux 系统下常用的监控工具,用于实时获取进程级别的 CPU 或内存使用情况。以下图 top 命令的输出信息为例。
Top 命令的输出信息主要分为两部分,上半部分显示 CPU 和内存资源的总体使用情况:
下半部分以进程为维度显示资源的占用情况:
# 直接定位到第100行 less +100g xx.log
# 定位到最后一行 less +GG xx.log
# 直接定位到50%的位置 less +100p xx.log
sudo apt install curl gnupg2 ca-certificates lsb-release2. 再仓库里生成list文件
echo "deb http://nginx.org/packages/debian `lsb_release -cs` nginx" \
    | sudo tee /etc/apt/sources.list.d/nginx.list
3. 增加key
curl -fsSL https://nginx.org/keys/nginx_signing.key | sudo apt-key add -4. 校验key
sudo apt-key fingerprint ABF5BD827BD9BF62
如果看到以下命令,表明成功
pub   rsa2048 2011-08-19 [SC] [expires: 2024-06-14]
      573B FD6B 3D8F BC64 1079  A6AB ABF5 BD82 7BD9 BF62
uid   [ unknown] nginx signing key <signing-key@nginx.com>
5. 安装nginx
sudo apt update
sudo apt install nginxtail -f命令可以查看文件更新的记录,但是在wsl中,可能无法正常工作。
经查找发现,Linux是通过inotify来获取文件变动的,但是不知道是bug还是什么原因,感知不到文件变动,造成此问题。
解决方案:使用tail -f ---disable-inotify 2019-02-21.log这个命令开查看日志,就可以了!
补充:在wsl中感应Windows系统中的文件变化,需要加上 —disable-inotify 此参数
时区文件位于`/etc/localtime`
系统的时区文件位于/usr/share/zoneinfo目录下,所以,需要做一个软连接,(centos)
ln -s /usr/share/zoneinfo/Asia/Shanghai /etc/localtime退出再重新登陆下,就可以了.PS: 之前遇到问题,按照以上修改后仍不能改变时间,于是在看`/etc/profile` 文件中,发现有名为TZ的环境变量,修改此变量TZ=’Asia/Shanghai’; export TZ 保存退出,执行命令:source /etc/profile 。
执行命令sudo pacman -S dotnet-sdk(这里用的manjaro)
运行完后,运行dotnet --info 查看版本,显示如下,说明安装成功。
.NET Core SDK (reflecting any global.json):
 Version:   2.2.102
 Commit:    96ff75a873

Runtime Environment:
 OS Name:     manjaro
 OS Version:
 OS Platform: Linux
 RID:         arch-x64
 Base Path:   /opt/dotnet/sdk/2.2.102/

Host (useful for support):
  Version: 2.2.1
  Commit:  878dd11e62

.NET Core SDKs installed:
  2.2.102 [/opt/dotnet/sdk]

.NET Core runtimes installed:
  Microsoft.NETCore.App 2.2.1 [/opt/dotnet/shared/Microsoft.NETCore.App]

To install additional .NET Core runtimes or SDKs:
  https://aka.ms/dotnet-download
2. 创建项目
执行命令 dotnet new web -o web 这句命令的意思是,创建一个ASP. NET Core Empty项目,并将该项目命名为web,显示一下信息说明项目创建成功
The template "ASP.NET Core Empty" was created successfully.

Processing post-creation actions...
Running 'dotnet restore' on weba/web.csproj...
  Restoring packages for /home/txl/csharp/weba/web.csproj...
  Generating MSBuild file /home/txl/csharp/weba/obj/web.csproj.nuget.g.props.
  Generating MSBuild file /home/txl/csharp/weba/obj/web.csproj.nuget.g.targets.
  Restore completed in 2.3 sec for /home/txl/csharp/web/web.csproj.

Restore succeeded.
3. 运行项目
运行dotnet build 命令,先编译下项目
Microsoft (R) Build Engine version 15.9.20.63311 for .NET Core
Copyright (C) Microsoft Corporation. All rights reserved.

  Restore completed in 609.99 ms for /home/txl/csharp/weba/weba.csproj.
  webtestapi -> /home/txl/csharp/weba/bin/Debug/netcoreapp2.2/weba.dll

Build succeeded.
    0 Warning(s)
    0 Error(s)

Time Elapsed 00:00:03.70在运行项目,dotnet run。
第一运行时可能会出现错误:
info: Microsoft.AspNetCore.DataProtection.KeyManagement.XmlKeyManager[0]
      User profile is available. Using '/home/txl/.aspnet/DataProtection-Keys' as key repository; keys will not be encrypted at rest.
crit: Microsoft.AspNetCore.Server.Kestrel[0]
      Unable to start Kestrel.
System.InvalidOperationException: Unable to configure HTTPS endpoint. No server certificate was specified, and the default developer certificate could not be found.
To generate a developer certificate run 'dotnet dev-certs https'. To trust the certificate (Windows and macOS only) run 'dotnet dev-certs https --trust'.
For more information on configuring HTTPS see https://go.microsoft.com/fwlink/?linkid=848054.
   at Microsoft.AspNetCore.Hosting.ListenOptionsHttpsExtensions.UseHttps(ListenOptions listenOptions, Action`1 configureOptions)
   at Microsoft.AspNetCore.Server.Kestrel.Core.Internal.AddressBinder.AddressesStrategy.BindAsync(AddressBindContext context)
   at Microsoft.AspNetCore.Server.Kestrel.Core.Internal.AddressBinder.BindAsync(IServerAddressesFeature addresses, KestrelServerOptions serverOptions, ILogger logger, Func`2 createBinding)
   at Microsoft.AspNetCore.Server.Kestrel.Core.KestrelServer.StartAsync[TContext](IHttpApplication`1 application, CancellationToken cancellationToken)

Unhandled Exception: System.InvalidOperationException: Unable to configure HTTPS endpoint. No server certificate was specified, and the default developer certificate could not be found.
To generate a developer certificate run 'dotnet dev-certs https'. To trust the certificate (Windows and macOS only) run 'dotnet dev-certs https --trust'.
For more information on configuring HTTPS see https://go.microsoft.com/fwlink/?linkid=848054.
   at Microsoft.AspNetCore.Hosting.ListenOptionsHttpsExtensions.UseHttps(ListenOptions listenOptions, Action`1 configureOptions)
   at Microsoft.AspNetCore.Server.Kestrel.Core.Internal.AddressBinder.AddressesStrategy.BindAsync(AddressBindContext context)
   at Microsoft.AspNetCore.Server.Kestrel.Core.Internal.AddressBinder.BindAsync(IServerAddressesFeature addresses, KestrelServerOptions serverOptions, ILogger logger, Func`2 createBinding)
   at Microsoft.AspNetCore.Server.Kestrel.Core.KestrelServer.StartAsync[TContext](IHttpApplication`1 application, CancellationToken cancellationToken)
   at Microsoft.AspNetCore.Hosting.Internal.WebHost.StartAsync(CancellationToken cancellationToken)
   at Microsoft.AspNetCore.Hosting.WebHostExtensions.RunAsync(IWebHost host, CancellationToken token, String shutdownMessage)
   at Microsoft.AspNetCore.Hosting.WebHostExtensions.RunAsync(IWebHost host, CancellationToken token)
   at Microsoft.AspNetCore.Hosting.WebHostExtensions.Run(IWebHost host)
at webtestapi.Program.Main(String[] args) in /home/txl/csharp/weba/Program.cs:line 17这个错误说明要安装一个证书,开启https,错误中已经给出提示,如果是linux系统,执行dotnet dev-certs https 命令。
如果是windows或mac系统,执行`dotnet dev-certs https –trust`。
运行dotnet dev-certs https, 出现以下问题。
Cannot find command 'dotnet dev-certs', please run the following command to install

dotnet tool install --global dotnet-dev-certs所以,又执行dotnet tool install --global dotnet-dev-certs 命令,却又出现这个…
Tool 'dotnet-dev-certs' is already installed.这里查了好久,发现dotnet-dev-certs是一个执行文件,位于$HOME/.dotnet/tools目录下,所以执行$HOME/.dotnet/tools/dotnet-dev-certs https,本以为没问题,结果又出现
A fatal error occurred, the required library libhostfxr.so could not be found.
If this is a self-contained application, that library should exist in [/home/txl/.dotnet/tools/.store/dotnet-dev-certs/2.2.0/dotnet-dev-certs/2.2.0/tools/netcoreapp2.2/any/].
If this is a framework-dependent application, install the runtime in the default location [/usr/share/dotnet] or use the DOTNET_ROOT environment variable to specify the runtime location.到这里,真是有点崩溃了,于是再找之,发现需要设置环境变量DOTNET_ROOT
设置环境变量export DOTNET_ROOT=/opt/dotnet,这个目录是不是很眼熟,没错,
就是dotnet --info命令中的Bash Path的前半段。
然后在在执行命令$HOME/.dotnet/tools/dotnet-dev-certs https
The HTTPS developer certificate was generated successfully.ok,终于看到希望了,再执行dotnet run ,成功!
项目发布,发布目标平台为linux x64,并且包含dotent 运行时,这意味着目标服务器可以不用装dotnet 环境也可以运行
dotnet publish -c Release -r linux-x64 --self-contained true